|
Configuring the
Disk Array:
The following
information applies only to disk array models. Use this
information to perform the tasks necessary to configure, add,
change, or delete one or more disk arrays.
If you need
to create an IBM RAID controller diskette, refer to the
ServerGuide User's Guide that was shipped with the
system.
Familiarize yourself with the information
contained in this manual and the RAID (redundant array of
inexpensive disks) information in the User's Reference shipped
with the server. Verify the disk-array configuration. The
disk-array model comes configured as one logical
drive.
- To view
the disk-array configuration, go to 'Viewing the RAID
Configuration' and select View Configuration from the Main
Menu.
- To
create a disk array, go to 'Creating a Disk Array'.
- Backup
the disk-array configuration. See 'Backing Up Your
Disk-Array Configuration'.
After you
configure the disk array, you can complete setup by installing
an operating system (from the ServerGuide compact disc that
was shipped with the server or from the diskettes that came
with the operating system). To install an operating system
from the ServerGuide CD, refer to the ServerGuide User's
Guide.
RAID
Technology:
RAID is the
technology of grouping several hard disk drives in a server
into an array that can be defined as a single logical drive.
This logical drive then appears to the operating system as a
single physical drive. This grouping technique greatly
enhances logical-drive capacity and performance. In addition,
if one of the hard-disk drives fails (becomes defective the
server continues to run, with no operator intervention
required, at reduced performance. The defective drive can be
replaced without powering off the server (hot-swap). For more
information about hot-swappable hard disk drives, see
'Installing Internal Drives'.
Hard Disk Drive
Capacities:
With a server, it
is important to understand the implications of hard disk drive
capacities and how they influence the way you create disk
arrays.
Drives in the disk array can be of different
capacities. For example, if the model came with two 1GB hard
disk drives and you install a 2GB hard disk drive to create a
RAID 5 disk array, the total capacity of the array is 3GB
instead of 4GB. Therefore, when creating arrays it is wise to
add drives of equal capacity.
Additional Storage
Capacity:
When you add hard
disk drives to the server, you must configure a new disk array
before the drives can be used. You can either reconfigure the
existing disk array to include the capacity offered with the
added drives, or group the added drives into their own array
(see 'Adding Drives to Create an Additional Arrayï). You also
can create an array with only one drive.
The RAID
Configuration Program Screens:
When you configure
the disk array, or even just view its configuration, you will
be using the IBM RAID configuration program on the IBM SCSI-2
Fast/Wide Streaming-RAID Adapter/A Option Diskette (also
called the IBM RAID controller diskette). The following figure
is a compilation of many of the IBM RAID Controller Disk Array
Configuration (also called the IBM RAID configuration program)
screens. The list below the figure gives explanations of the
numbered areas of the figure.
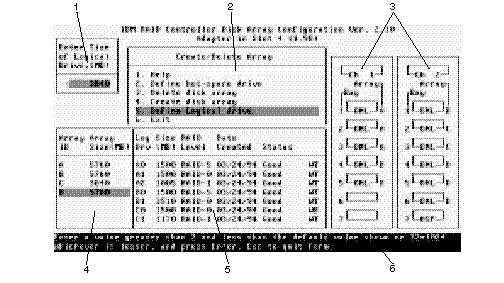
1. This pop-up allows you to select the RAID level you
want to assign to the logical drive you are defining, and it
allows you to select the logical drive size. You can enter the
size, in megabytes, or you can accept the default value shown.
When you need to confirm an action, the Confirm pop-up appears
in this area.
2. You can select
any of the choices that appear on the menus.
3. The Bay/Array
selection list shows each bay in the server (for each channel)
numbered 1 through 7. The abbreviation in the bay indicates
the status of the drive installed in the bay. Selections are
made from this list to determine which bays (hard disk drives)
are in the arrays. The letter to the right of the bay,
identifies the array in which the hard disk drive in that bay
is grouped.
NOTE: The
Channel/Bay/Array area on the screen does not reflect the
physical configuration of the server. The hard disk drives are
installed in horizontal banks of bays (in banks C, D, and E
there are 6 bays, numbered 1 through 6 from left to right).
See 'Installing Internal Drivesï to see the physical location
of the hard disk drives.
4. The Array list
shows you the array ID and the size (in megabytes) of the
array.
NOTE: The capacity (size) is shown in
binary equivalent.
When a drive is being rebuilt, this
area, along with the Logical Drive list area, shows the
progression of the rebuilding process.
5. The Logical
Drive list identifies the logical drive (for example, A1), the
size of the logical drive, the RAID level assigned to the
logical drive, the date it was created, and the write
policy.
The status of the logical drive also is shown.
Good means that all is well with the drive; Critical means
that you must replace the drive or do a rebuild operation.
(You will have received a message telling you the drive is in
a Critical state.) Offline means that the logical drive is
unrecoverable; the data in that drive is lost.
When a
drive is being rebuilt, this area, along with the Array list
area, shows the progression of the rebuilding
process.
NOTE: The capacity (size) is shown in
binary equivalent.
During an initialization process,
the Write Policy area displays the percent initialized; during
a synchronization process, it displays the percent
synchronized. 6. The information area tells you the action you
can perform on this screen or
pop-up. |