
|
52.962 bytes |
Product Information |
Document ID: MCGN-437MBJ |
Netfinity 5500 M10 - Microprocessor Kit Installation
Applicable to: World-Wide
Your server comes with one microprocessor installed on the processor board. When you install an additional microprocessor kit, your server can operate as a symmetric multiprocessing (SMP) server. With SMP, certain operating systems and application programs can distribute the processing load between the microprocessors. This enhances performance for database and point-of-sale applications, integrated manufacturing solutions, and other applications.
|
Before you begin:
- Read "Safety Information".
- Thoroughly review the documentation that comes with the microprocessor, so that you can determine
whether you need to update the server basic input/output system (BIOS). The latest level of BIOS for your server is
available through the World Wide Web and the IBM Bulletin Board System (BBS). Refer to "Online Support" on page iv
for the appropriate World Wide Web addresses and bulletin-board telephone numbers.
- Obtain an SMP-capable operating system (optional). For a list of supported operating systems, see
http://www.pc.ibm.com/us/compat/ on the World Wide Web. |
|
Notes
1. The illustrations might differ slightly from your hardware.
2. To avoid damage and ensure proper server operation when you install a new or an additional microprocessor,
use microprocessors that have the same cache size and type, and the same clock speed. Microprocessor internal
and external clock frequencies must be identical.
3. If you replace the microprocessor in your server with a microprocessor with a different speed, be sure to set the
Microprocessor Core Frequency Selection switch correctly. See "Processor Board Jumpers" for more information.
4. The microprocessor that is installed in the primary microprocessor connector is CPU or processor 1. If a
microprocessor is installed in the secondary microprocessor connector, it is CPU or processor 2. If the server has only
one microprocessor installed, that microprocessor is installed in the primary microprocessor connector and is the boot
processor. If the server has two microprocessors installed, the microprocessor in the secondary microprocessor
connector is the boot processor and the microprocessor in the primary microprocessor connector is the application
processor. |
Refer to the following illustrations of the processor housing and processor board. while you perform this procedure.
|
Note
The illustrations show only the processor housing and processor board for simplicity; you do not need to remove the
processor housing and processor board to install a microprocessor kit. |
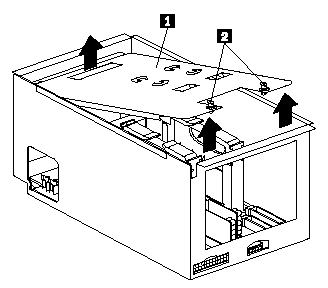
1 Processor housing cover
2 Quarter-turn fastener
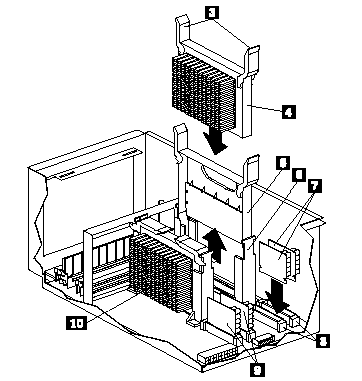
3 Latches
4 Secondary microprocessor (CPU or processor 2)
5 Terminator card
6 Secondary microprocessor connector
7 Voltage regulator modules (VRMs) for secondary microprocessor
8 VRM connectors for secondary microprocessor
9 VRMs for primary microprocessor
10 Primary microprocessor (CPU or processor 1)
To install an additional microprocessor kit:
1. Turn off the server and peripheral devices and disconnect all external cables and power cords (see "Preparing to Install Options"); then remove the top cover (see "Top Cover Removal").
2. Turn the two quarter-turn fasteners 2 on the processor housing cover 1 one quarter turn and remove the cover from the processor housing.
3. Remove the terminator card 5 from the secondary microprocessor connector 6 . You do not need the terminator card when you have a second microprocessor installed. You can store it in a safe place in the static-protective package that your new microprocessor is shipped in.
4. Install the microprocessor:
a. Touch the static-protective package containing the new microprocessor to any unpainted metal surface on the server; then, remove the microprocessor from the package.
b. Hold the microprocessor 4 by the open latches 3 , and center the microprocessor over the secondary processor connector 6 .
|
Attention
Make sure the microprocessor is oriented and aligned correctly before you try to close the latches. |
c. Carefully close the latches 3 to seat the microprocessor in the connector.
5. Install the two voltage regulator modules (VRMs) 7 included in the microprocessor kit secondary microprocessor:
a. Center the first VRM over the connector 8 .
Make sure that the VRM is oriented and aligned correctly; then, press the VRM into the connector. The latches should snap into the locked positions.
b. Repeat the preceding step for the second VRM.
|
Note
If you remove the secondary microprocessor at some time in the future, remember to install the terminator card
in the secondary microprocessor connector and to remove the VRMs for the secondary microprocessor. |
6. Install the processor housing cover 1 and turn the two quarter-turn fasteners 2 one quarter turn to secure the cover.
7. If you have other options to install or remove, do so now; otherwise, go to "Completing the Installation".
|
|
Search Keywords |
|
|
Document Category |
Diagrams |
|
|
Date Created |
15-12-98 |
|
|
Last Updated |
15-12-98 |
|
|
Revision Date |
15-12-99 |
|
Brand |
IBM PC Server |
|
Product Family |
Netfinity 5500 M10 |
|
|
Machine Type |
8661 |
|
|
Model |
|
|
|
TypeModel |
|
|
|
Retain Tip (if applicable) |
|
|
|
Reverse Doclinks
and Admin Purposes |
|