Metal Structure Tutorial for Infinity Textures

This is an advanced tutorial for complex operations on a texture to open you the full power of Infinity Textures. Here you build a special, industrial metal pattern. By doing the following steps you learn how to use the Source Texture feature which is the key for complex and stunning textures.
The tutorial requires standard settings for the operations of I-Tex. Engage Reset Operation ConfigPool in the Global Configuration menu item to make the tutorial work best. 
 

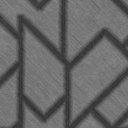
At first you should open a new texture (File Menu => New Texture) which is unusual large (for example 512x512 pixels). This is necessary to give you more precision

Choose a bright background color (secondary color) like here, then click on the clear texture button on the tool bar under the menu. 


-Now choose a dark color. 
-After this select the Line functions and choose the solid function. 
-Adjust the pen size parameter, which is the line thickness, to 2. 

Now your artistic talent is required. 
-You have to draw several connected lines on the surface to create a pattern. Press Shift on your keyboard while drawing your lines. This will create horizontal, vertical and diagonal lines only. 

Ready ? Well done.

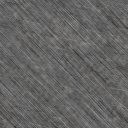
Well, now another step is needed. You have to create a surface texture for your pattern. What about some brushed metal?

-Open a new texture with the same size like your pattern above. 

Metal's usually gray, isn't it? 
-Ok, choose a dark gray primary color now. 
-Choose also a dark gray secondary color, which is slightly brighter than the primary color


-Activate the Generator Engine (icons on the tool bar, or in the Tools menu). 
-There choose the Plasma function. 
-Look on the Tool Config window (usually on the left). Click on P2S Gradient at the Generator Color Settings. The plasma will have only colors between the primary color and the secondary color then. 
-Now click on the texture to generate the plasma.


It doesn't look like metal yet. Some scratches will help. 
-Activate the Fill and Filter function category and choose Noise \ Scratch. -Now adjust the direction of the scratches in the Tool Config window (like here diagonal).
-After this click several times on the textures to generate the scratches.

Much better now.

-It is very important that you press the Source button on the texture window. This will make I-Tex use the metal surface texture for the following steps.
 

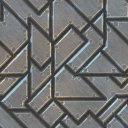
-Please switch back to your pattern that you created at first. 
-Make a copy of this pattern by pressing the Clone texture button on the tool bar. This is important for later operations.


-Keep Fill and Filter selected and choose the Edge Trace \ Normal function. The Edge Trace functions are some of the most powerful functions of I-Tex as you will see.

-Have a look at the Tool Config window again. 
-Make sure you have an Edge Size parameter of 10 and the Edge Mode 1 selected. 
-Activate the check box of the Use Source as Texture option. This will make the scratched metal texture be used during the edge trace function because you have set it as source

-Choose a light gray primary color
-Now click on the bright areas of the pattern and after this click somewhere on the dark lines. Give I-Tex some seconds to render the image. Now you will see your pattern changed into 3D objects. 

...but something seems to be missing ... light.


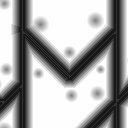
How to illuminate your texture? This can be done by using the Bump functions. Advanced texture designers will create a separate high map for the bump functions because this works much better. OK, let's create one.

Notice: This sample image is a zoomed part, not the entire picture.


-Switch to the second copy of your starting pattern. 
-Keep the Edge Trace function enabled. 
-Deactivate the Use Source as Texture option. 

-Choose a white primary color
-Now click on the bright areas and after this on the dark lines again. You will see clean and white objects now which are darker at their borders.


Hmm, I think some rivet holes would be cool. A great task for our high map. 
-Please activate the Ellipses function category. 
-There you should find the Gradient \ Blend function - select it.

-Choose a black primary color

Holes are just darker areas on the high map because the brighter a pixel on the high map is the higher it will be interpreted by I-Tex. Really simple : black is low, white is high and gray is something between. Colored high maps will be converted to a monochrome image internally by I-Tex. OK ... but let's proceed.

-Draw several small, black and filled circles on the high map. Circles are just ellipses which have the same height like the width. Press shift on your keyboard to create circles instead of ellipses. The holes are really a lot of work ... they should take some minutes.

Ready ? Well done, again. Let's hope your high map looks similar to the sample image on the left. Set the high map texture as Source now. We want to use it on the texture used during the last steps above.


Switch to the texture with the 3D-scratched-metal-objects. 


-Now choose the Bump \ Free Light function which is a function of the Fill and Filter category - activate it. 
-In the Tool Config window you can see the Direction configuration again. You can adjust the direction from where the light will be simulated. 

-Choose a light color. The light color is the primary color
-After you have chosen a color you can click on the texture. The high map, that you have created and set as Source, will be used to illuminate the texture. Do you see the rivet holes and edges come out? 
-Click several times if the light is not bright enough.

Here orange was used to simulate light from right below and a bright blue, like the spheres on the background, was used to simulate light from left above. Right, try different colored lights from several directions for great effects.

-After you've illuminated your texture well enough try a single Bump \ Triple Point function. This will make the texture to be illuminated better from left above.


Congratulations
This was a big step forward.
Now you have this large and beautiful texture. Usually 512x512 pixels is a little bit too large for web pages. Scale it down to 256x256 pixels by using the Rescale Texture button. This will also give extra quality to the texture because four pixels will be summarized to a single pixel. Now save the texture (File Menu => Save Texture) and show it to your friends ... they will be astonished ;-).